
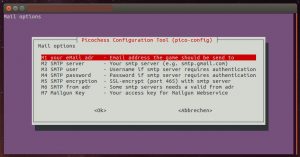
In last months i put alot of effort to make all picochess settings available on the DGT clock too. But some settings aren’t that important or simply too complex to enter on the DGT chess clocks – for example your eMail(-server). Also alot of users would like to be able to bring their DGTPi clock online to update picochess.
Well, for the WPA keys there is a way from the underlying linux system called “raspi-config”. All you need to do it login to your raspberry pi (DGT-Pi chess computer), and enter this command by hand. But despite this wlan stuff – as an example what you can configure with raspi-config – i’m always asked to provide a better user interface to setup more. Similar to “raspi-config” i implemented a software called “pico-config”, where you can setup most missing picochess parameters. This software is not meant to be used all the time instead to build a bridge to users fearing to enter commands on linux directly. Right now this software is not part of picochess, but if download it here:
pico-config 4.85 MB 1012 downloads
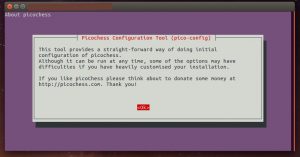
What you can do with pico-config This tool allows you to change some picochess.ini...Since this tool is no longer beta and alot of people using this without giving me abit money back, i now decided to increase the minimum price from 0€ to 2€. If you have a subscription plan you get from 50% to 100% discount (depending on your level).
Since 22.Aug 2018 you can download this tool for free for your personal usage. But you are not allowed to make it public available! If y like it, please take a look at the “about” tool-section 😉
If y have a subscription plan and using a picochess version 0.9P or above y need a different tool. That’s cause i have new flags there. Please download it from the appropriate place.
I shortly describe abit the software sections:
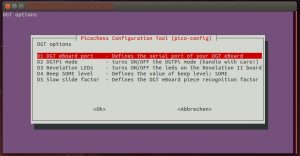
Another parameter is this “slow slide factor” which basically slow down the piece recognition in case you suffer from multi spoken voices during you’re sliding very slowly. Please only change this to not zero if you suffer this problem.
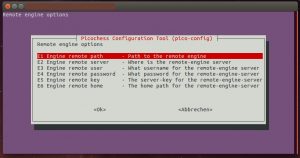
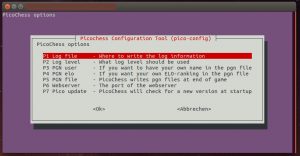
You navigate through the menus selecting with “ok” or go back one step to upper levels. If you at the top level leaving this tool your choosen values are written to the picochess.ini file. Now you only need to restart your picochess and you can enjoy this settings. Have fun!
Hi Jürgen,
please send me the tool
changed my mind. Please see link from top of this post 🙂
I have tried to setup Picochess on my Raspberry PI and it half works but for some reason it does not display the piece letter when it makes a move, i.e. when moving Nf6 it just displays g8 – f6. The same with the other pieces. Is there some way to fix this or is my clock broken?
This format is when
– you have a XL clock / revelation II (with old firmware)
– your display setting is long format. This you can change by going to Menu>System>Display>Notation and use notation = “short”
which command starts this tool … with “sudo pico-config” it does not work
This morning i had to fix it. So if your version is old (or in doubt of status), please reload it again.
But yr command is OK => go to folder and call pico-config.
sudo ./pico-config works a treat
A very useful tool for those who don’t edit their own picochess.ini file
Thanks Jürgen
To download pico-config, you need to get an account. Please post a short comment here if you want to buy (even for 0€) this tool.
Al:
Thanks! Since now youre a registered user you can also change your picture etc.
Hello Jürgen,
Thanks for your big project and contribution to the comunity, and to share it… I have interest to have access to pico-config but I can´t login or register…. Is possible to be part of the register users?
i created an user for you
please create an account for me.
Thanks
Hi Benny,
you can do that yourself. See footer below.
hi Jürgen,
do I still need Putty for a ssh connection?
yes, y need to be logged in on yr clock/raspberry.
2.4 pounds for a simple ini editor?
come on man.
Its not a simple ini editor instead a tool to help people who dont want to use “nano”.
From the 2,40€ i need to pay paypal fees and german taxes btw.
Would be great if anybody could sent me an installation-instruction. I am happy, that I got installed Picochess on my Raspberry Pi with some manuals, but I have no chance here 🙁
Hi Hans-Michael,
y can find an install docu on https://picochess.com/download/pico-config/
Jürgen
Thank you for this information, but when clicking the link I get “Access denied” Message 🙁
sorry.
It should work now.
Jürgen
Hallo Jürgen,
ich schreibe mal in Deutsch ich bin dem Englisch nicht so mächtig 🙁
ich habe mir das Picochess configuration tool herrunter geladen und ich habe es auch hinbekommen mit dem WinSCP die Datei zu übertragen ich habe es auf dem Picochess ausgepackt und wolltw es öffnen aber das Programm geht nicht auf. Ich habe eine Version won ich bei Topschach gekauft habe .
Es müsste eine vor der 0.91 sein ,wo kann ich die VersionNr auslesen?
Ich möchte das Wifi einstellen und dann über ein Tablet spielen.
wäre super wenn Du mir helfen könntest.
Lg Ludwig
Hi Ludwig,
was bedeutet genau “es geht nicht auf”? Was genau hast du gemacht und was passiert (Fehlermeldung)? Nur zur Sicherheit: Das Programm läuft auf dem Rasp (nicht auf windows).
Grüße, Jürgen
Hallo Jürgen,
ich wollte jetzt mal mit dem Putty arbeiten.
Wie müsste ich die Datei dann auf die Nano-Karte übertragen?
Kann man mit dem Putty auch Dateien übertragen .
Ich habe bis jetzt nur Datei damit editiert.
Ich habe schon auf viele Arten versucht das Wlan zu aktivieren aber ohne Glück. Habe es immer mit Anleitung für den raspberry pi probiert.
Währe für eine Anleitung sehr dankbar.
lg Albi
Hallo Jürgen ,
das Toll jetzt habe ich meine neuen DGT PI zerstört.
Ich habe mit Putty darauf zu gegriffen und was falsch gemacht.
Habe vorher mit dem Programm Linux File die Dateien von der Nano gezogen und dachte wenn ich die Nano löse und die Daten wieder zurückspiele
würde alles wieder laufen. ich nehme an ich habe was überschrieben.
Kannst Du mir bitte helfen sonst habe ich gleich 230 Euro in den Sand gesetzt 🙁
Lg Albi
Hi Ludwig,
WLAN in Gang setzen, hat nix mit picochess zu tun. Es gibt doch viele (gute) Anleitungen wie man das aktiviert. Mehr könnte ich Dir auch nicht sagen.
Am einfachsten ist doch das neue “raspi-config” bei dem man nun auch WLAN einstellen kann. Da brauchst du kein nano oder irgendein anderen Editor. Wenn du nur das alte raspi-config auf der SD Karte hast, musst du dich halt mit den Anleitungen und nano durchkämpfen.
Keine Sorge! ..ich denke nicht, das du 230€ in den Sand gesetzt hast. Um die Hardware zu schrotten, muss man schon ziemlich wilde Sachen machen. Wahrscheinlich musst du dir ein neues OS auf die SDKarte kopieren (am schnellsten), bzw. deine Versuche reparieren – was aber schwieriger ist, weil du wohl nicht weisst, was du wie kaputt gemacht hast.
Ich schlage vor, du kaufst dir eine neue SD Karte, brennst darauf ein DGTPi-Image (siehe meine Seite) – also nicht kopieren, sondern mit einem Brennprogramm – und dann tauschst du die vorhandene SD-Karte in deinem Pi aus. Dann booten, und es sollte wieder so wie früher gehen.
Kann dir Benny nicht helfen? Ich habe nur wenig Zeit, und eine Linux-Schulung biete ich leider nicht an – Selbst den Club musste ich aktuell(!) schließen. Verzeih mir bitte!
Hallo Jürgen,
danke für die Info!
Kann ich mit Win 10 das Image auf die Nano brennen
oder brauche ich ein Linuxprogramm?
lg Albi
windows geht auch – ist dem Brennprogramm ja egal, was da geschrieben wird. Wichtig ist nur, das du es nicht normal drauf kopierst (also als eine Datei).
Was meinst du denn mit “nano”? SD-Karte?
nano ist eigentlich ein simpler (&guter) Editor.
Das bekommst du sicherlich hin. Viel Glück.
Hallo Jürgen,
ja, ich habe es hin bekommen 🙂
Ich habe noch einen Respberry mit einer DGT 3000 !
Ich habe einen USBWlan stick angeschlossen und Ihn zum laufen gebraucht.
aber Leider komme ich nicht auf den Webserver.
Bei dem DGT Pi geht das ganz einfach wenn ich die IP-Adresse in meinen Firefox
eingebe aber bei dem Respberry mit der DGT 3000 geht das nicht 🙁
Ich habe mir schon mal die Picochess.ini angeschaut aber da blicke ich nicht durch. Kannst Du mir helfen?
Ich denke ich muss die IP-Adresse in die Picochess eintragen?
Ich danke Dir!
Lg Albi
Hallo Jürgen,
jetzt geht es beim DGT Pi auch nicht mehr -:(
Geht das nur wenn ich Dein Pico-konfig geladen habe ?
Lg Albi
Nein..das geht auch ohne Tool. Das Tool hilft nur dabei die INI Datei zu editieren.
Wenn es nicht geht, schaust du mal nach dieser Zeile:
# web-server = 8080
Der “# ” muss weg, und u.U. 80, statt 8080 eintragen.
Hallo Jürgen,
danke für die Antwort,hat super geklappt!
lg Albi